Everything for the job: SOP Catheterization of cubital and other peripheral veins
Main part of the SOP
Terms and Definitions
Catheter-associated bloodstream infection (CABI) is an inflammatory process that develops when pathogenic microorganisms enter the bloodstream from the lumen of an infected PVB or an infected vein puncture site. Peripheral venous catheter is a device for providing and maintaining peripheral venous access. Hematoma is bleeding under the skin. Infiltration is the entry of infusion solutions or medications that do not cause irritation into the tissues surrounding the vein. Thrombosis is the formation of a blood clot in a vein. Extravasation is the entry of drugs with irritating properties into the tissue surrounding the vein. Phlebitis is an inflammation of the vein wall, leading to the destruction of the venous walls. It can provoke the formation of blood clots - in this case it turns into thrombophlebitis.
Abbreviations used:
HAI – healthcare associated infections; ICU – intensive care unit; CAI – catheter-associated bloodstream infection; PVC – peripheral venous catheter; SOP is a standard operating procedure.
Normative references:
1. SanPiN 2.1.3.2630-10 “Sanitary and epidemiological requirements for organizations engaged in medical activities.” 2. Order of the Ministry of Health and Social Development of Russia dated December 27, 2011 No. 1664n “On approval of the range of medical services.” 3. GOST R 52623.4-2015 “Technologies for performing simple medical services and invasive interventions.” 4. Guidelines for providing and maintaining peripheral venous access, RAMS, St. Petersburg, 2011.
Equipment
Name of products and tools: – robe, cap, mask; – sterile and non-sterile gloves; – an apron, goggles or mask with a protective screen; – individual sterile set (tray, tweezers); – scissors or an atraumatic surgical razor with disposable cutting attachments (trimmer); – aseptic transparent dressing; – sterile fixing bandage; – sterile peripheral venous catheter, adapter (obturator or plug with injection membrane); – tee; – medicines (heparinized solution); – tourniquet; – alcohol-containing antiseptic for treating the catheter insertion site; – alcohol-containing antiseptic for hand hygiene; – sterile wipes for cleaning the catheter insertion site; – bandage for additional fixation; – container for used tools (tray, tweezers, scissors); – waterproof yellow container (bag) for class B waste; – a container with a disinfectant solution for surface treatment.
I. Preparation for the procedure
1. Select the smallest size of the PVK (see Appendix 1) according to the following criteria: – vein diameter;
– required rate of drug administration; – potential residence time of the catheter in the vein; – properties of the injected solution. 2. Check the integrity of the catheter packaging and the date of manufacture. 3. Prepare and deliver to the ward a manipulation table with the necessary equipment placed on it and place it close to the place of manipulation. 4. Identify the patient, introduce yourself, explain the process and purpose of the procedure. 5. Make sure that the patient has signed informed consent for the procedure. If informed consent is not signed, check with your doctor for further steps. 6. Invite the patient to take a comfortable position, help him in this, if necessary. The patient's position should provide access to the site where the PVC is installed. 7. Select a site for insertion of the PVK according to the product manufacturer’s instructions: – distal veins – above the site of previous catheterization; – well palpable veins; – make sure that there is no soft tissue inflammation or phlebitis at the catheter insertion site; – make sure that the vein is well filled; – make sure that the vein is located on the non-dominant arm; – make sure that the vein is located on the side opposite to the surgical intervention; – make sure that the vein has a sufficiently large diameter. II.
Algorithm for performing the procedure 1. Put on a gown, hat, mask and goggles or a mask with a protective screen. 2. Treat your hands with an alcohol-containing skin antiseptic in a hygienic manner. 3. Do not dry your hands, wait until the antiseptic has completely dried. 4. Wear sterile gloves. 5. Treat the catheter insertion site with a sterile alcohol-containing wipe in the direction from the center to the periphery. 6. Wait the time necessary for the antiseptic to act on the treated surface (do not palpate the catheter insertion site). 7. Apply a tourniquet 10–15 cm above the catheter insertion site. The maximum time the tourniquet is on the limb is 2 minutes. Watch for pulsation on the radial artery - it should persist. 8. Re-treat the intended catheter insertion site with an antiseptic. 9. Take the catheter and remove the protective cover. Hold the case between the fingers of your free hand if it has an optional cap. 10. Secure the vein by pressing it with your fingers below the intended catheter insertion site. 11. Pierce the skin, vein and insert the catheter needle at an acute angle. Watch for the appearance of blood in the indicator chamber. 12. Fix the stiletto needle. 13. Slowly slide the catheter cannula from the needle into the vein to the end. Do not allow the stylet needle to be inserted into the catheter after it has been displaced into a vein. 14. Remove the tourniquet. 15. Pinch the vein with your finger above the catheter insertion site (this will reduce bleeding). 16. Remove the stylet needle from the catheter and discard into a Class B waste container. 17. Remove the plug from the catheter and attach the infusion set. 18. Remove your finger from the vein. 19. Inspect the catheter insertion site and surrounding area. Make sure there is no hyperemia or swelling. 20. Apply an aseptic transparent sterile dressing to the catheter insertion site. Secure the catheter using a sterile bandage. 21. If there is a risk of accidental removal of the catheter, secure it additionally with a sterile bandage. 22. Dispose of used material into a Class B waste container and bag. 23. Remove gloves and place them in a disinfectant container or waterproof Class B waste bag/container. 24. Clean hands using hygienic methods and dry hands. 25. Ask the patient how he is feeling. 26. Make a note about the installation of the PVC on the observation sheet (Appendix 2). 27. Paste the observation sheet into the medical history.
III. Intermediate control
1. Assess radial artery pulsation after applying a tourniquet.
2. Assess the patient's well-being after completion of the procedure. IV.
Daily Catheter Care Algorithm 1. Put on a gown, cap, mask, goggles, or face shield.
2. Perform any manipulations with the catheter wearing sterile gloves. 3. Inspect the catheter entry site every 12 hours through an intact dressing. Look for signs of inflammation - swelling, soreness. 4. Assess the condition of the catheter insertion site using the phlebitis scale (Appendix 3) and make appropriate notes on the PVC observation sheet. 5. During the procedure, follow the rules of asepsis. 6. Do not touch infusion equipment with your hands. 7. Use tees according to the timing of catheter use. 8. If infusion therapy is not carried out, then flush the catheter with saline twice a day. Additionally, flush the catheter: – before each infusion to confirm its patency; – after infusion therapy, to prevent mixing of incompatible drugs and chemical irritation of the inner wall of the vein with the infusion solution. 9. If the catheter becomes obstructed, remove it immediately, without rinsing. 10. Change the infusion lines of the perfusers once a day. 11. Dispose of used materials and products as class B waste. 12. Perform hand hygiene. 13. Enter the inspection data of the catheter insertion site into the PVK condition monitoring sheet (Appendix 2). V. Algorithm for changing the bandage
1. Monitor the condition of the fixing bandage daily.
2. Change the dressing: – no later than after 12 hours, if the catheter is installed on an emergency basis, with a possible violation of aseptic rules; – every 72 hours in the absence of signs of inflammation; – immediately if the bandage becomes loose, dirty or wet. 3. When changing the dressing, follow the rules of asepsis. 4. Before changing the dressing, put on a gown, cap, mask, and, if necessary, an apron. 5. Wear clean, non-sterile gloves. 6. Remove the bandage, slowly wrapping it parallel to the skin (do not pull upward), preferably along the hair growth - this is necessary to prevent damage to the skin around the catheter entry site. 7. Place the removed bandage in a waterproof bag/container. 8. Place used gloves in a waterproof bag/container for class B waste. 9. Using a sterile antiseptic wipe, taken using sterile tweezers, treat the skin around the catheter - from the center to the periphery. 10. Discard the tissue in a waterproof bag/container. 11. Use a sterile antiseptic wipe using sterile tweezers to clean all parts and connections, including the cannula and catheter. Wait for the antiseptic to dry completely. 12. For patients with sensitive skin around the catheter site, apply a barrier agent with a sterile wipe. 13. Apply a sterile aseptic dressing. 14. Secure the catheter using a sterile fixation bandage. 15. Dispose of used material into a container and bag for Class B waste. 16. Remove gloves and place them in a disinfectant container or waterproof bag/container for Class B waste. 17. Sanitize hands and dry them. Monitoring when caring for the catheter
1. After infusing sterile saline, inspect the catheter insertion site and the area adjacent to it.
Make sure there is no swelling or hyperemia. 2. Every 12 hours, inspect the catheter installation site to see if symptoms of phlebitis or inflammation have appeared. If the patient is receiving medications that irritate the vein, shorten the interval. 3. Assess the site of catheter insertion using the phlebitis scale (Appendix 3). 4. Assess the catheter insertion site using the infiltration scale (Appendix 4). Potential complications and risks
1. Phlebitis (see Appendix 3). 2. Infiltration (see Appendix 4). 2. Extravasation. 3. Catheter-associated bloodstream infection. 4. Hematoma. 5. Thrombosis.
VI. Procedure in emergency situations
1. If you find signs of an inflammatory process - infiltration, phlebitis, report them to your doctor. 2. Write about the signs of the inflammatory process in the PVC observation journal. 3. Follow your doctor's instructions.
VII. List of entries
1. Logbook of observation of LOAC. 2. Medical history. 3. Journal of department procedures.
VIII. Criteria for performing the procedure
1. PVC placement was performed in a timely manner, as prescribed by the attending physician. 2. The procedure was carried out strictly according to the algorithm, there are no deviations from the algorithm. 3. The medical history contains a record of the place, date and time of installation of the PVC. 4. The LOAC monitoring log is complete. 5. The patient is informed about the medical service. 6. The patient is satisfied with the quality of the medical service.
Annex 1
Peripheral Venous Catheter Sizing Guide
| Color | Application | Size | Flow rate (l/hour) | ||
| Crystalloids | Plasma | Blood | |||
| Orange | Used in life-threatening and emergency situations for transfusion blood or viscous fluids | 14G | 16,2 | 13,5 | 10,3 |
| Grey | Used for life-threatening and emergency situations for transfusion of blood or viscous liquids | 16G | 10,8 | 9,4 | 7,1 |
| White | Blood transfusions, transfusions of viscous liquids or large volumes of infusion | 17G | 7,5 | 6,5 | 4,6 |
| Green | Blood transfusions, parenteral nutrition, stem cell collection, large volumes of infusion | 18G | 4,8 | 4,1 | 2,7 |
| Pink | Blood transfusions, large volume infusions, or prolonged infusions | 20G | 1,9 | 1,7 | 1,1 |
| Blue | Blood transfusions, most drugs or solutions | 22G | 1,9 | 1,7 | 1,1 |
| Yellow | Most medications | 24G | 0,8 | 0,7 | 0,5 |
| Yellow (N) | Neonatology | 24G | 1,44 | 0,7 | 0,5 |
| Violet | Neonatology | 26G | 0,8 | 0,7 | 0,5 |
Appendix 3
Phlebitis rating scale
| Degree | Signs | Image | Recommended Actions |
| 0 | No pain or symptoms | Continue observation | |
| 1 | Pain/redness around the catheter insertion site | Remove the catheter and install a new one in another area Watch both areas | |
| 2 | Pain, swelling, redness. The vein is palpated as a dense cord | Remove the catheter and install a new one in another area. Monitor both areas. Start treatment if prescribed by your doctor | |
| 3 | Pain, swelling, thickening, redness. The vein is palpated as a dense cord more than 3 cm. Suppuration | Remove the catheter and send the catheter cannula for bacteriological examination. Place a new catheter in a different area. Take a blood sample from a vein in a healthy arm and conduct a microbiological analysis | |
| 4 | Pain, swelling, thickening, redness. The vein is palpated as a dense cord more than 3 cm. Suppuration. Tissue damage | Remove the catheter and send the catheter cannula for bacteriological examination. Place a new catheter in a different area. Take a blood sample from a vein in a healthy arm and perform a microbiological analysis. Register a case of infection in the infectious diseases register (form No. 60/u) |
Appendix 4
Infiltration Rating Scale
| Degree | Signs |
| 0 | No symptoms |
| 1 | – pale, cold to the touch skin; – swelling <2.5 cm in any direction from the catheter site; – possible pain |
| 2 | – pale, cold to the touch skin; – swelling from 2.5 cm to 15 cm in any direction from the catheter installation site; – possible pain |
| 3 | – pale, translucent skin, cold to the touch; – extensive swelling > 15 cm in any direction from the catheter site; – complaints of mild or moderate pain; – possible decrease in sensitivity |
| 4 | – pale, translucent, taut skin; – the skin is bluish and swollen, exudation is observed; – extensive swelling > 15 cm in any direction from the catheter site; after pressing with a finger on the site of swelling, an impression remains; – circulatory disorders, complaints of moderate or severe pain; – grade 4 is assigned to infiltration of any number of blood products/drugs with irritant or vesicant properties |
" " 20 " " 20
PROFESSIONAL COMPETENCE
Peripheral venous catheterization and catheter care name of standard operating procedure
PERSONAL RATING SHEET for evaluation by the head of the department
FULL NAME. employee Division Position, full name of manager Date of assessment
| Criteria for evaluation | Employee actions | Self-esteem (points) | Manager's assessment (points) | ||||||||
| 1 | 2 | 3 | 4 | 5 | 1 | 2 | 3 | 4 | 5 | ||
| Knowledge: 1) procedures: – informing the patient; – execution technology; 2) conditions for performing the service; 3) a technician working with medical products, instruments, materials; 4) rules for the collection and disposal of used materials; 5) safety measures when performing the procedure; 6) complications and risks associated with the procedure; 7) procedures for action in emergency situations. | Can describe: – patient information techniques; – conditions and algorithm for performing the procedure; – rules of asepsis and antiseptics; - security measures; – indicators and criteria for monitoring the patient’s condition; – complications and risks; – procedure for action in emergency situations; – forms of maintaining medical records; – conditions for disinfection of instruments, collection and disposal of materials after use. Can: – evaluate the results of the procedure; | ||||||||||
| Skill: – obtain informed consent from the patient; – perform the procedure; - work with documentation | – ask a controlling question to the patient when obtaining informed consent; – prepare and carry out the procedure; – record the results of the procedure in medical documentation | ||||||||||
| Skills | Can: – perform the procedure; – assess the patient’s condition before and after the procedure; – fill out medical documentation forms | ||||||||||
| Responsibility for the quality of medical services | Patient satisfaction. No complications for the patient | ||||||||||
| The evaluation criteria and actions of employees are given as an example. Include in the indicated columns the organization's system for assessing employee knowledge. | |||||||||||
Result of the final test of knowledge and skills
division name
position, full name of the person who assessed the knowledge and skills of professional competence
| № | Employee's full name | job title | Date of training | Evaluation result | Signature of the person being certified | Conclusion of the person who conducted the inspection (admission, re-training, etc.) | |||
| knowledge | skills | skills | responsibility | ||||||
Responsible executors are familiar with and undertake to perform:
| No. | Surname | Signature | date |
Intravenous (venous) catheter
Vascular catheters are designed to provide access to central and peripheral veins.
These catheters should not be confused with cavity catheters, such as the Foley catheter, Nelaton catheter and others. Indications for placing a peripheral venous catheter.
1. Emergency administration of infusion solutions with the prospect of using the created venous access in the hospital. Most often this is done in the confines of an ambulance.
2. In the hospital, peripheral catheters are placed during long-term intravenous therapy.
3. Intravenous anesthesia during surgery.
4. Install a catheter for women in labor
5. Frequent collection of venous blood for tests.
6. Blood transfusion.
7. In case of parenteral (intravenous) nutrition of the patient.
8. Temporary measure before insertion of a central catheter.
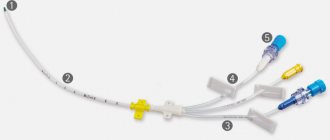
Description of the peripheral venous catheter
Externally, they are a packaged disposable product for long-term intravenous infusions.
A – peripheral intravenous catheter with a port. B – peripheral intravenous catheter without port. A standard intravenous peripheral catheter consists of: - a polymer tube connected to a polymer cannula (1), - a metal needle tube connected to the cannula, - a polymer plug (2). — port (3) optional.
Classification of peripheral venous catheters
There are the following subtypes of intravenous catheters:
1. By the presence of an additional port.
- with port; - without port;
Peripheral catheter with an additional port.
There is a variant of an intravenous catheter with an additional port.
The port is located on top of the catheter. The catheter port allows bolus (quick) administration of medications or flushing of the catheter with heparin and saline. solution. Most modern peripheral catheters have an additional port. The port is closed with a plastic cap to ensure sterility Example of an intravenous peripheral catheter with an additional port
2. By the presence of wings:
— peripheral catheter with wings; - peripheral catheter without wings;
The wings may have holes for suturing to the patient's skin.
3. Based on the presence of a safe device at the peripheral catheter:
— peripheral catheters are safe;
- standard peripheral catheters
Peripheral catheters are safe.
Currently, peripheral safety catheters are becoming available from a number of manufacturers. Most of them implement a safe device due to the presence of a special capsule, or “bullet,” which, after catheterization, is automatically put on the needle. This eliminates the risk of needle injury to medical personnel. In this case, the technique for placing a peripheral safety catheter is no different from the standard technique. The price for peripheral safe catheters is significantly higher than for catheters that do not have such a device. You can buy a peripheral catheter
on our website.
4. According to the presence and number of X-ray stripes on the wings of the catheter:
- without x-ray contrast stripes;
- 2 stripes;
- 4 stripes;
- 6 stripes.
5. Intravenous catheters sizes by color
In accordance with GOST ISO 10555-5-2012, the sizes of catheters are determined. The size of the peripheral catheter is determined by the gauge. Intravenous catheters differ in color. For convenience, each peripheral catheter size is color coded. This allows the medical professional to quickly select the appropriate catheter size for a specific procedure. The table below shows intravenous catheters with sizes by color. Each tube outer diameter has a specific color code.
This table is not identical to GOST R ISO 6009-2013.
You can select and buy an intravenous catheter in our catalog. Delivery is carried out throughout the Russian Federation by SDEK. To the catalogue.
6. Needle butterfly
It is a special type of peripheral catheter. The butterfly needle is a needle integrated with wings with a tube. The length of the butterfly needle tube differs depending on the model. Unlike the classic peripheral catheter, the butterfly needle is intended for short-term insertion. Also suitable for blood collection. One of the key advantages of the butterfly needle is the small diameter of the needle. Butterfly needles are placed for no more than 24 hours.
Scope of application of butterfly needle:
1. Resuscitation and gerontology for patients with “collapsed” veins
2. Neonatology (maternity hospitals and specialized departments of hospitals). Designed for administration and collection of blood to newborns and young children.
3. Blood collection from severe patients.
Safe butterfly needles
There are butterfly needles with a safety device, this is the so-called safety butterfly needle
After the infusion is carried out using a safe butterfly needle, the medical staff removes the needle from the vein and presses a special button on the body of the safe butterfly needle. As a result, the needle goes into a special cylinder, eliminating the risk of infection of personnel. Safe butterfly needles are most in demand when working with urgent patients and with known infected patients
GOST catheters
The main GOST for catheters is GOST ISO 10555-5-2012. This guest describes:
- catheter structure;
- catheter color coding;
- requirements for the needle, catheter cannula;
- flow rate;
- strength of the connection between the cannula and the tube;
- information on individual packaging.
The material was prepared using the following sources:
- GOST ISO 10555-5-2012 Single-use sterile intravascular catheters. Part 5. Peripheral catheters with an internal needle;
- GOST R ISO 6009-2013 Single-use injection needles. Color coding;
- GOST R ISO 11070-2010 Single-use sterile introducers. Technical requirements and test methods.